Model Contributions
We are happy that you are considering contributing your model to medigan. This will make your model accessible to the community and our users can easily integrate your synthetic data into their training pipelines and experiments.
Guide: Automated Model Contribution
Create an __init__.py file in your model’s root folder.
Next, run the following code to contribute your model to medigan.
Your model will be stored on Zenodo.
Also, a Github issue will be created to add your model’s metadata to medigan’s global.json.
To do so, please provide a github access token (get one here) and a zenodo access token (get one here), as shown below. After creation, the zenodo access token may take a few minutes before being recognized in zenodo API calls.
from medigan import Generators
gen = Generators()

# Contribute your model
gen.contribute(
    model_id = "00100_YOUR_MODEL", # assign an ID
    init_py_path ="path/ending/with/__init__.py",
    model_weights_name = "10000",
    model_weights_extension = ".pt",
    generate_method_name = "generate", # in __init__.py
    dependencies = ["numpy", "torch"],
    creator_name = "YOUR_NAME",
    creator_affiliation = "YOUR_AFFILIATION",
    zenodo_access_token = 'ZENODO_ACCESS_TOKEN',
    github_access_token = 'GITHUB_ACCESS_TOKEN',
)
Guide: Manual Model Contribution
In the following, you find a step-by-step guide on how to contribute your generative model to medigan. In case you encounter problems during this process feel free to reach out by creating an issue here and we will try to help. Checkout the figure below that shows the main components of the model contribution workflow depicted in yellow (d).
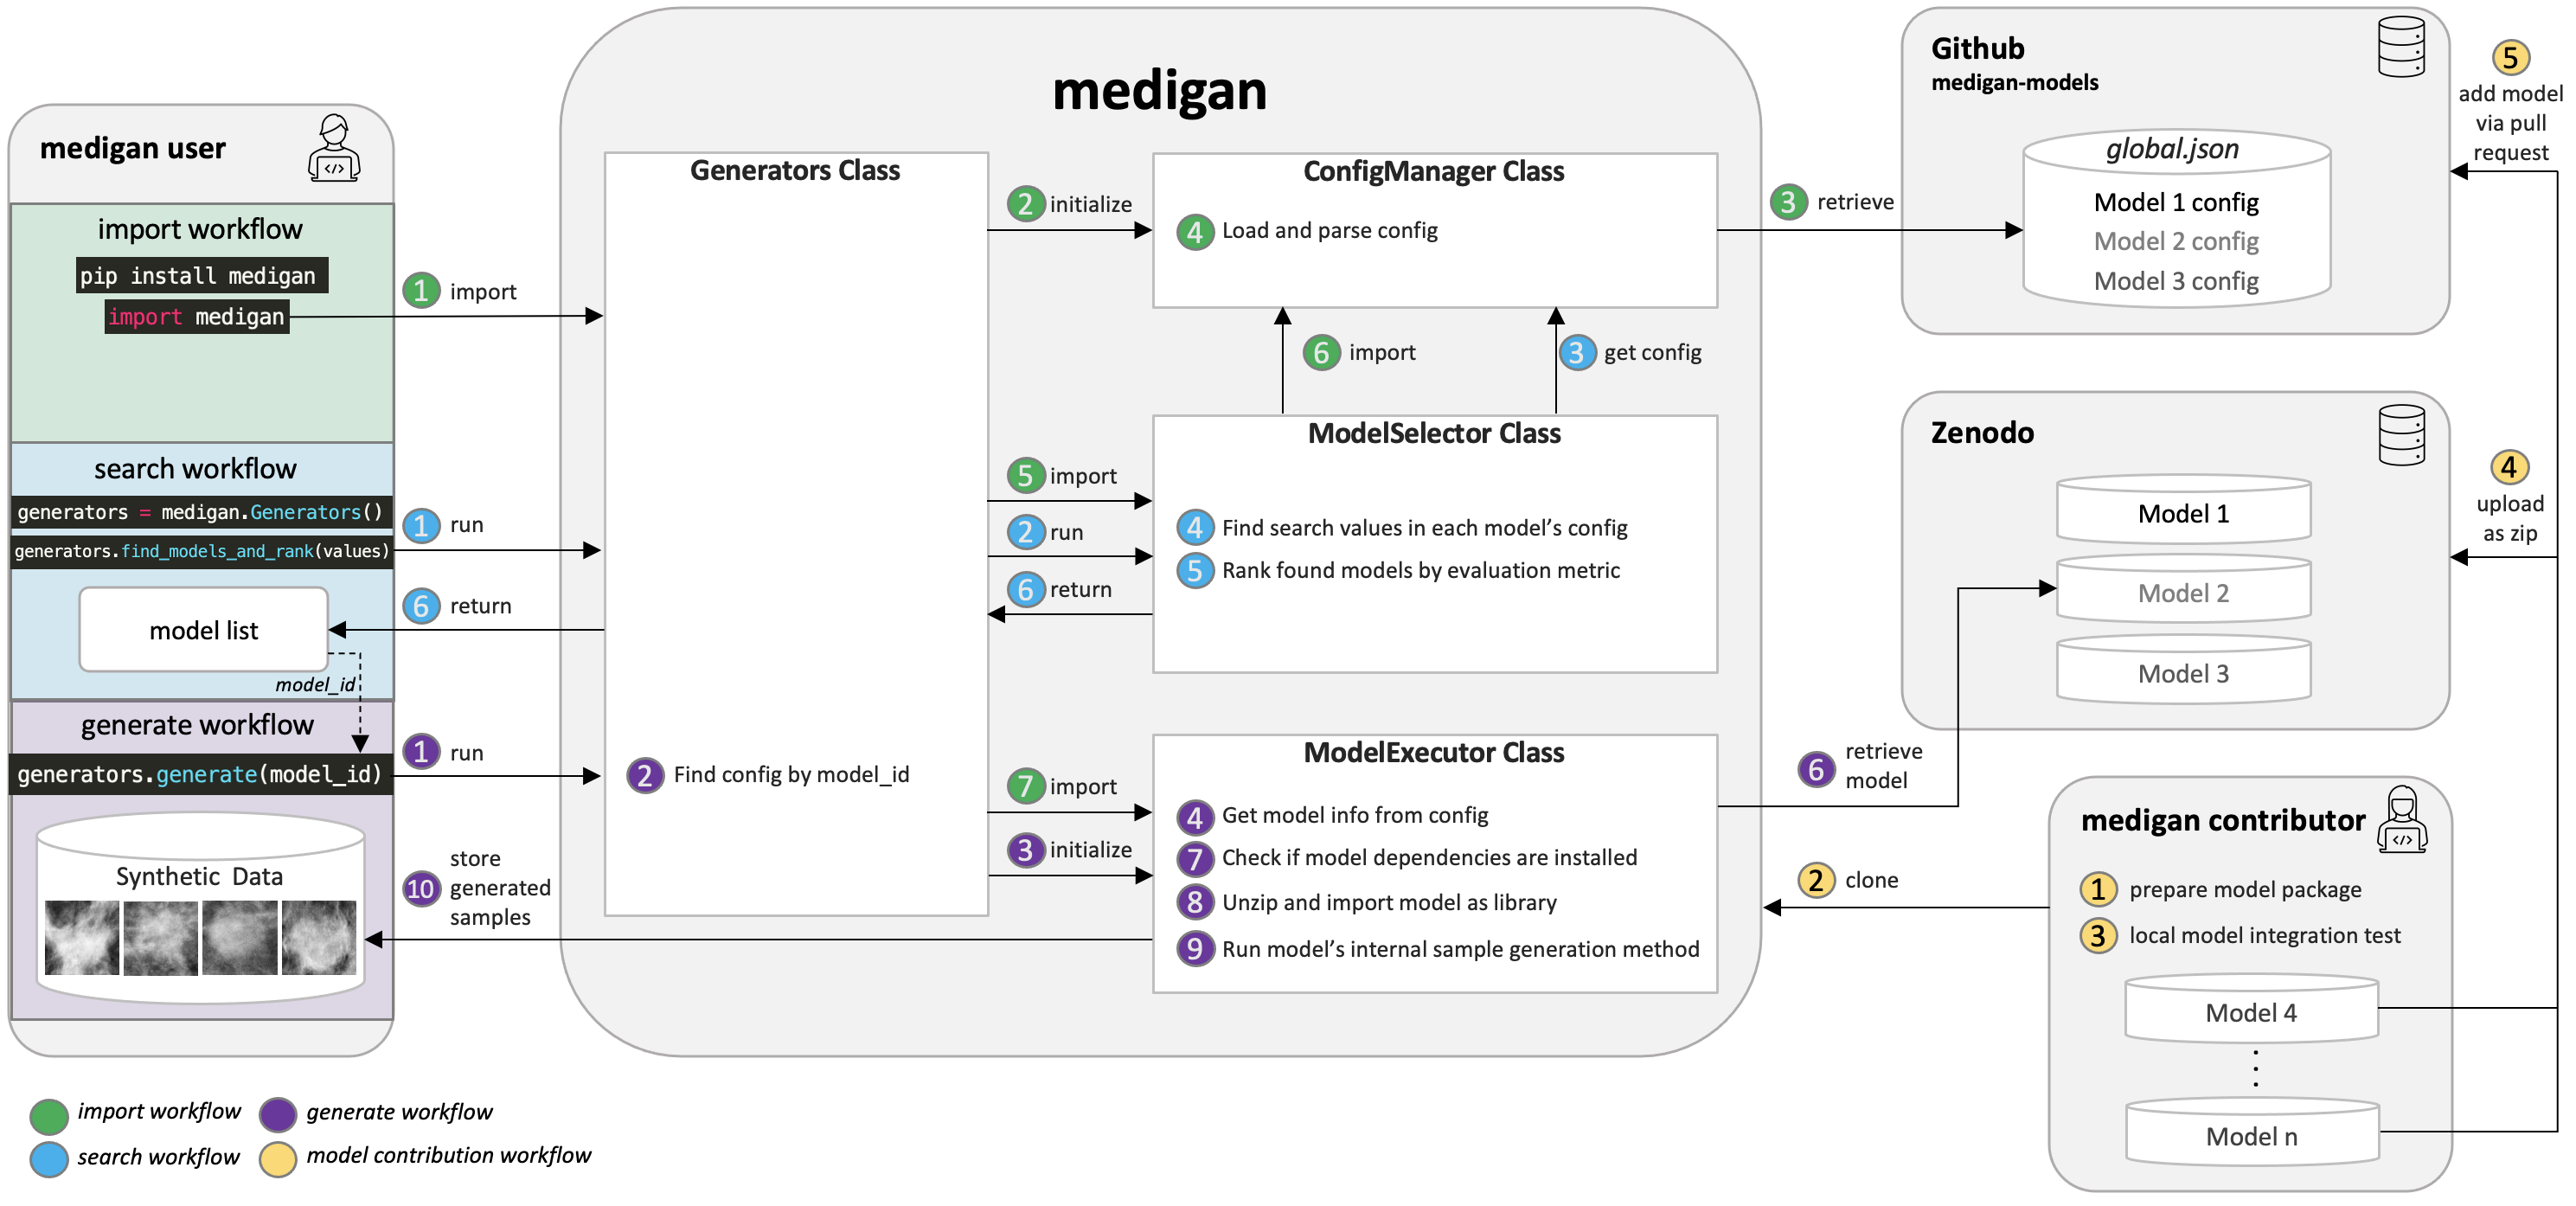
Architectural overview including main workflows consisting of (a) library import and initialisation, (b) generative model search and ranking, (c) sample generation, and (d) generative model contribution.
If you are here, you have recently developed a generative model such as a GAN, VAE, Diffusion Model, etc and you would like to boost your model’s impact, reusability, dissemination by uploading it to medigan. We are delighted and will assist you in adding your model.
Firstly, let’s create the needed files:
To add your model you will need the following files.
A checkpoint file that contains your trained model weights (e.g., the
state_dictin pytorch)An
__init__.pyfile that contains functions thatload the weights file (let’s call that one
weights.pt)initialize your model with these weights
generate samples with the initialized model.
Now that you have the
weights.ptand the__init__.py, let’s check if we can make them work together.Run your
__init__.py’s generate function using e.g.python -m __init__.py generateCheck whether your model did load the weights effectively and whether synthetic samples were generated as expected.
Apply some necessary adjustments to your model package, particularly to your
__init__.py:We have some templates that you can use to guide the adjustments described below
If you are using a model that generates samples without image input (e.g., noise-to-image): Download Model 00002 from here. Unzip it and open the
__init__.pythat contains an examplegenerate()method.If you are using a model that generates samples with image input (e.g., image-to-image): Download Model 00003 from here. Unzip it and open the
__init__.pythat contains an examplegenerate()method.
Please note that user’s of medigan models may add your model to their preprocessing or AI training pipelines. Please make sure that your model, hence, runs efficiently. For instance, your model should load the weights only once even though the generate() function is called multiple times.
Please make sure your model is able to run both on gpu and on cpu and your code automatically detects on which one to run.
Please replace all
print()functions from your code withlogging.debug()(for this you need toimport logging).Please add appropriate error handling using
try, exceptblocks on each possible source of error in your code.raisethe error in yourgenerate()function to allow medigan to handle it and pass it to the user.If your generative model needs some input images, provide a few example images in a folder called
/images. Users may test your model with these example images before feeding their own input images to your model.There are a few parameters of the
generate()that are mandatory in medigan and others that you can set optionally.- Mandatory:
model_file: string, the path where yourgenerate()method will find its weight fileoutput_path: string, the path where ourgenerate()method should store the generated imagessave_images: boolean, whether yourgenerate()method should store generated samples inoutput_pathor return them as numpy arrays.num_samples: int, the number of samples that should be generated.
- Optional:
input_path: string, the path where ourgenerate()method finds images that should be used as input into the generative model (i.e. in image-to-image translation).image_size: array, that contains image height, width, and, optionally, also depth.translate_all_images: boolean, in image-to-image translation, ifTrue, this overwrites thenum_samplesand instead translates all images found ininput_path.gpu_id: int, if a user has various GPUs available, the user can specify which one of them to use to run your generative model.
- Secondly, test your model locally:
Okay, now that we know which files we need, let’s test them using a local version of medigan.
Let’s start by cloning medigan e.g. using the command line:
git clone https://github.com/RichardObi/medigan.gitNext, cd into medigan, install the dependencies of medigan, and create a virtual environment.
You can do so running these commands:
cd mediganpip install pipenvpipenv installpipenv shell
Now that you have your environment up and running, please run the following command to download the config file.
python -m tests.tests TestMediganMethods.test_init_generators
In the folder
/config, you should now see a file called global.json. In this file each model’s metadata is stored.Please add the metadata for your model at the bottom of the global.json file.
To add the metadata, you can use the metadata of model 00001 in global.json as example.
- Copy the metadata of model 00001 and add it to the bottom of
global.json. Then adjust each entry in that part of the json so that it represents your own model. The
model_idshould follow the conventionNNNNN_TTTTTT_MMMM_AAAAA_GGGG(N = Number of model, T = Type of model, M = Modality, A = Anatomic/Ailment Information, G = Generated Sample Type information i.e. full for full image or roi for region of interest)The field
package_link(underexecution) should point to a local zip fileNAME_OF_YOUR_MODEL_PACKAGE.zipof your model package.json entries below
executionare important and needed to run the model in medigan, e.g. the name and parameters of agenerate()function in the__init__.pyjson entries below
selectionare important to enable users to search and rank the model compared to other models in medigan, e.g. the performance indicators such as SSIM, MSE, PSNR, etc.json entries below
descriptionare to allow tracing back the origin and metadata of the model and allow users to get further information about the model, e.g. license, related publications, etc.
- Copy the metadata of model 00001 and add it to the bottom of
You are almost done! It’s Testing Time!
Run a local test using the following code:
from medigan import Generators
gen = Generators()
gen.generate(model_id="YOUR_MODEL_ID")

# Test a few variations.
test_dict = {"translate_all_images": True, "SOME_OTHER_OPTIONAL_PARAMS": True}
gen.generate(model_id="YOUR_MODEL_ID", num_samples=100, output_path="here", save_images=True, **test_dict)
If you are code runs well with different settings/params, congratulations, you have made it! You integrated your model as a package into medigan and are now ready for the final steps.
Thirdly, upload your model:
Package and upload your model to Zenodo - home to your model’s code and documentation.
First, check if your model package folder contains an
__init__.py, aweightsfile, alicensefile, and optionally other files.The next step is to zip this folder. To do so (e.g., on MACOS) you may
cdinto the folder and use the following commands (while removing hidden OS system files):find . -name ".DS_Store" -delete zip -r NAME_OF_YOUR_MODEL_PACKAGE.zip . -x ".*" -x "__MACOSX"
- Now that you have your model package zipped and ready, note that medigan model’s are commonly stored in Zenodo, as in Zenodo
they get a DOI
the content of their package is non editable i.e. no file modifications/updates without new DOI.
This helps to avoid security issues as package content remains static after the model is tested, verified, and added to medigan.
Zenodo has a close to unlimited storage capacity for research data/software.
Also, the authorship/ownership of the model are clear
There is transparent licensing.
Each model is versioned in Zenodo with different DOIs.
A model documentation and contact information can be added.
Checkout this example of our model 00001 on Zenodo. You can use the Zenodo documentation of this model as template for your own model upload.
Now, let’s go to the Zenodo website.
Click on
New Upload(if you don’t have an account, you can quickly create one e.g., using your ORCID)Fill in the metadata fields for your model and upload the model package zip file (i.e. drag and drop).
Click on
SaveandSubmit. Congratulations your model is now on Zenodo! Good job!
Finally, add your model to `medigan’s` model metadata:
Last step!!! Your model is on Zenodo and tested locally. Now we can officially add it to medigan. Remember the
global.jsonthat you created locally to test your model? It is time for glory for this file.Now, clone the medigan-models repository (the home of medigan’s global.json) e.g. by using
git clone https://github.com/RichardObi/medigan-models.gitCreate and checkout a new local branch
git checkout -b mynewbranchOpen the
global.jsonin your cloned local medigan-modelsEdit the
global.jsonfile and add your model’s entry at the bottom, and save.Note that this is the time to replace the value of
package_linkfrom your local model file path to your new Zenodo model URL. To get this URL, go to the Zenodo page of your model, and scroll down toFiles, where you see a download button. Copy the url link that this button points to, which is yourpackage_link.Commit the new file (
git add .,git commit -m "added model YOUR_MODEL_ID.") and push your branch (git push).Lastly, go to the repository medigan-models and create a pull request that merges your recently pushed branch into
main.That’s it!!! Your pull request will be evaluated asap. Once approved your model is officially part of medigan!
If you have suggestions on improvements for our model contribution process, please take a minute and let us know here.
Conventions that your model should follow
Your model should have a
generatemethod with the params model_file:str, num_samples:int, save_images:bool, and output_path:str (see `template (templates/examples/__init__.py>`_)Also, the model should do simple error handling, run flexibly on either gpu or cpu, use
logginginstead ofprints, and create some sort of synthetic data.
We hope to welcome you model soon to medigan! If you need support, please let us now here.